Shore Hardness ACD Conversion and Difference

Shore Hardness Concept
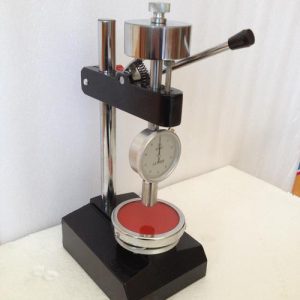
The Shore scleroscope hardness (Shore), initially proposed by British scientist Albert F. Shore, is commonly referred to as HS and serves as a standard for measuring material hardness. The Shore hardness tester is suitable for determining the Shore hardness value of both ferrous and non-ferrous metals, with the hardness value representing the extent of elastic deformation exhibited by the metal. This term is frequently used in the rubber and plastic industry.
Test Method
The Shore hardness tester is inserted into the material to be measured, the pointer on the dial is connected with a needle through a spring, and the needle is inserted into the surface of the object to be measured, and the value displayed on the dial is the hardness value
Classification and Scope of Application of Hardness Tester
The commonly used models of hardness testers include the Shore A, C, and D types. Each model has its specific applications: the Shore A type is primarily used for testing the hardness of plastic and synthetic rubber materials; the Shore Type C is designed for determining the hardness of microporous materials containing foam made from rubber and plastic with a compression rate of over 0.5kg/c㎡ at 50%, but can also be applied to other similarly hard materials; while the Shore D type is suitable for testing the hardness of general hard rubber, hard resin, acrylic, glass, thermoplastic, printing plates, fibers, and other high-hardness materials.
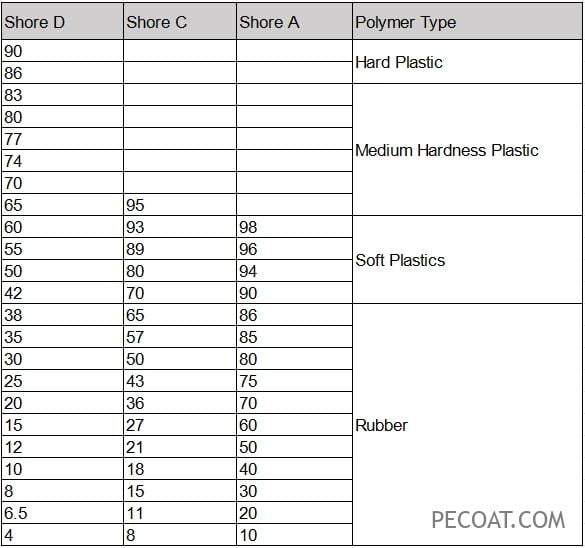
Comparison Table of Shore Hardness A, C, and D
The ACD order should be taken into consideration when referring to the diagram.

Conversion of Shore A Hardness and D Hardness
The above table indicates that materials with a Shore hardness below 90A are measured using the A scale, while materials with a hardness higher than 90A are measured using table D. It should be noted that the measurement methods for Shore A and Shore D hardness differ, resulting in only an approximate conversion relationship between the two scales. The conversion formulas are as follows:
1) D = A – 50;
2) A = 0.173D + 86.58.
As observed from the aforementioned table, this conversion is merely an approximation; therefore, it is advisable to select the appropriate type of hardness tester based on actual testing requirements.

Leave a Reply